There’s a certain magic to homemade candy, and few confections capture hearts quite like classic peanut brittle. That perfect balance of sweet and salty, combined with an irresistible, airy crunch, makes it a timeless treat, especially during the holidays. Whether you're a seasoned candy maker or trying your hand at this delightful creation for the first time, achieving that ideal brittle texture – crunchy but not hard, light, and full of flavor – is the ultimate goal. This guide delves into the pro tips and secret techniques that will elevate your peanut brittle from good to absolutely unforgettable, ensuring it wows everyone, every time.
The Essential Ingredients for Unforgettable Peanut Brittle
Crafting the best peanut brittle starts with understanding the role each ingredient plays. While recipes may vary slightly, the core components are surprisingly simple, often found in most kitchens. However, the quality and preparation of these ingredients are key to the final texture and taste.
- Granulated Sugar: The foundation of any brittle, sugar provides the sweetness and forms the molten base. While white granulated sugar is standard, some variations might explore brown sugar for a deeper caramel note.
- Corn Syrup: This often-debated ingredient plays a crucial role for many, acting as an invert sugar. Light corn syrup prevents sugar crystallization, ensuring a smooth, grain-free syrup that sets into a perfectly clear, crisp candy. Some traditional recipes omit it for an "old-fashioned" texture, which can be slightly more prone to graininess but offers a distinct flavor profile.
- Water: Simply put, water helps dissolve the sugar completely, creating a uniform syrup before the cooking process truly begins.
- Salt: A pinch of salt is non-negotiable. It brilliantly cuts through the sweetness, enhancing all the other flavors and creating that addictive sweet-and-salty dynamic. If you opt for salted butter, you might adjust or omit additional salt.
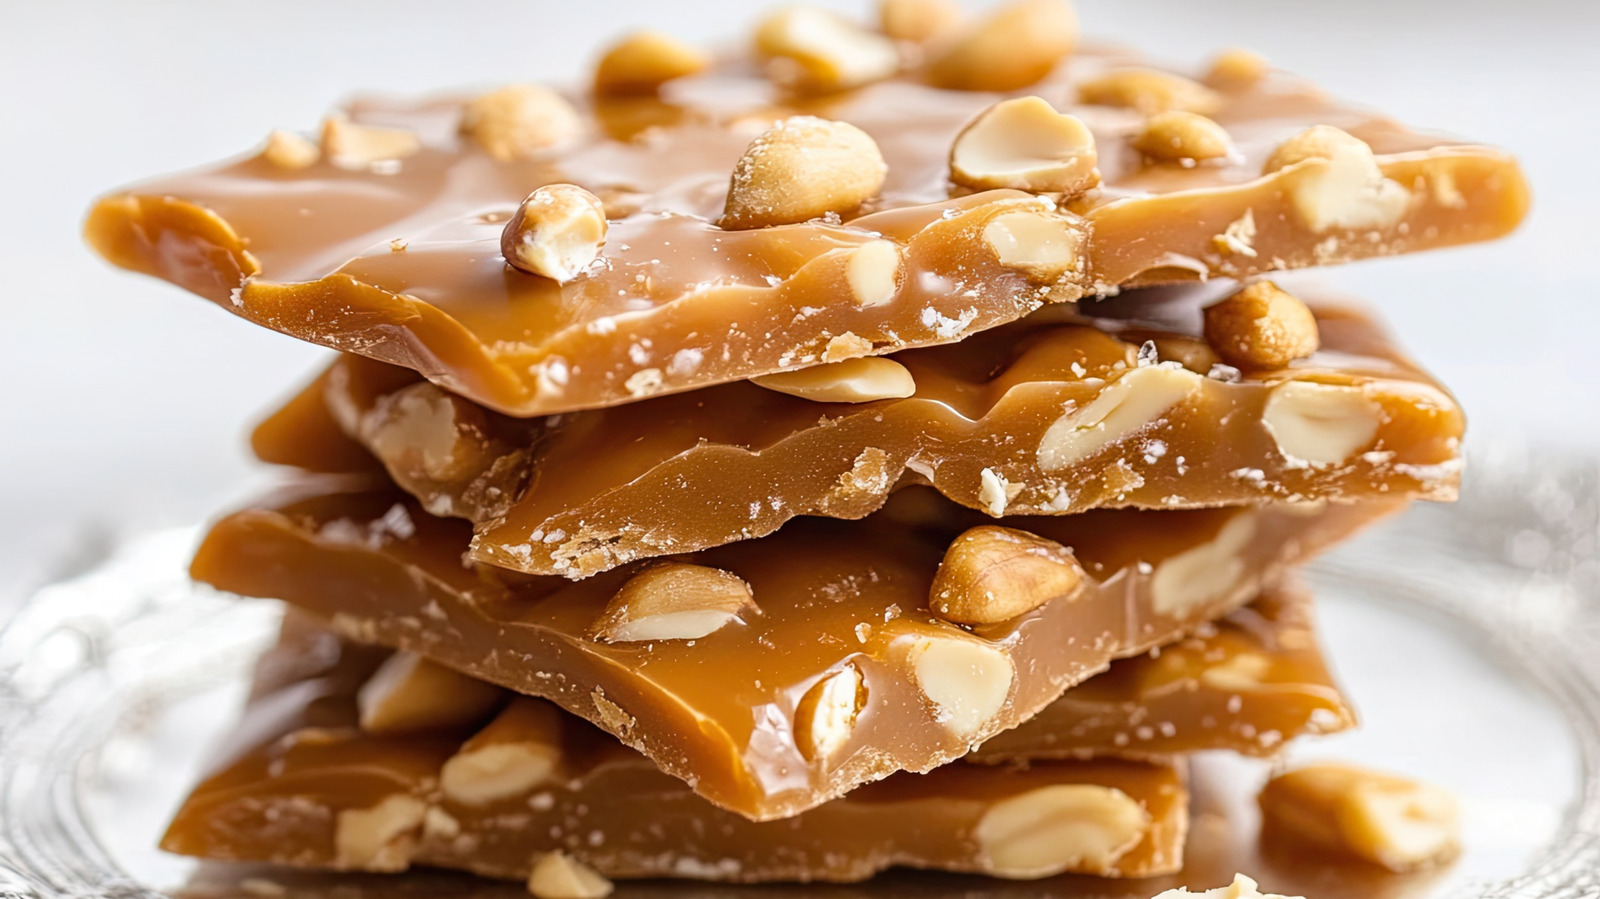
- Peanuts: The star of the show! Raw peanuts are often preferred by connoisseurs for a deeper, richer flavor when toasted in the hot syrup, sometimes even with their skins on for an authentic, rustic touch and a slightly darker brittle. However, roasted peanuts can also be used, lending a different flavor profile. Make sure they are fresh for the best results.
- Unsalted Butter: Butter adds a decadent richness and a beautiful gloss to the finished brittle. Unsalted is generally recommended as it gives you control over the overall salt content, preventing your candy from becoming overly salty.
- Baking Soda: This is arguably the most critical secret to airy, light peanut brittle. When added to the hot sugar mixture, baking soda reacts with the acids in the syrup (even subtle ones formed during cooking) to release carbon dioxide gas. These tiny bubbles become trapped in the candy as it cools, creating the characteristic porous, airy, and delightfully "brittle" texture.
Mastering the Method: Step-by-Step for Success
Making peanut brittle isn't just a recipe; it's a timed performance. Speed and precision are paramount, meaning preparation is your best friend. As culinary experts often advise, there's no time for "dilly-dallying" once the cooking begins.
The Golden Rule: Mise en Place
Before you even turn on the stove, have every ingredient measured out and ready to go. Line a baking sheet with parchment paper or a silicone mat and lightly grease it. Ensure you have your wooden spoon or heat-proof spatula, and a reliable candy thermometer clipped to your heavy-bottomed pot. This preparation ensures you can react quickly at each critical stage.
Cooking to Perfection: Temperature is Key
The core of peanut brittle making involves cooking a sugar syrup to a very specific temperature: the "hard crack" stage, typically between 300°F and 310°F (149°C-154°C). This high temperature removes almost all the moisture from the sugar, making it brittle when cool.
- Initial Boil: Combine sugar, corn syrup (if using), water, and salt in your heavy-bottomed pot. Stir until the sugar dissolves over medium heat. Once boiling, stop stirring to prevent crystallization.
- Add Peanuts: Introduce your peanuts. The reference from "Mom's Best Peanut Brittle" suggests raw peanuts with skins on for a rich flavor, adding them early allows them to toast gently in the hot syrup.
- Cook to Hard Crack: Continue cooking, monitoring the temperature with your candy thermometer. This is where patience pays off. Don't rush it. The syrup will transition from clear to a golden amber.
- The Thermometer Alternative: If you don't have a candy thermometer, you can use the cold water test. Once the syrup turns amber, drop a small amount into a bowl of very cold water. If it forms hard, brittle threads that snap easily, it's ready. If it's still pliable, keep cooking.
- Butter and Baking Soda: The final, critical additions. Once your syrup reaches the hard crack stage (or passes the cold water test), immediately remove it from the heat. Stir in the butter until melted and fully incorporated, then quickly add the baking soda. This is the moment you'll see the mixture foam and lighten in color as the air bubbles form. Stir just enough to combine – over-stirring can deflate the bubbles.
Spreading and Cooling
Working quickly, pour the hot, aerated mixture onto your prepared baking sheet. Using an oiled spatula or the back of an oiled spoon, spread it thinly and evenly. The thinner you spread it, the snappier and more delicate your brittle will be. Allow it to cool completely at room temperature, undisturbed, until hard and crisp. Resist the urge to touch it while it's cooling!
Unlocking the Secrets: Achieving Crunchy, Airy Perfection
While the steps above outline the process, understanding the "why" behind certain actions is what truly elevates your peanut brittle from good to extraordinary – achieving that coveted crunchy, airy texture. This is where the magic truly happens.
The Power of Baking Soda
As mentioned, baking soda is your secret weapon for airiness. Its reaction with the hot sugar syrup is what creates those delicate air pockets. When culinary producer Nicole McLaughlin (a.k.a. NicoleMcMom) notes that you know you've made your brittle correctly if you can see "little pockets of bubbles around the edges," she's confirming the success of the baking soda's work. These trapped air bubbles are what give the candy its signature "brittle" quality, making it light, tender, and easy to break into pieces, rather than a dense, tooth-shattering slab.
Precision in Temperature Control
The "hard crack" stage isn't just a suggestion; it's a requirement for crunch. If your syrup doesn't reach the correct temperature, it will retain too much moisture, resulting in a chewier, stickier candy instead of a crisp, snappy brittle. Conversely, overshooting the temperature can lead to a burnt, bitter taste. A reliable candy thermometer is your best friend here, ensuring consistent, perfect results every time. Remember, the syrup continues to cook for a short period even after being removed from heat, so taking it off slightly below the target and letting carryover heat do the rest can be a smart move, especially for beginners.
Spreading Thinly and Quickly
The moment the baking soda is incorporated, you have a very short window to pour and spread the brittle. The mixture cools and hardens rapidly. Spreading it thinly not only ensures a satisfying snap with every bite but also allows the heat to dissipate quickly, preserving those precious air bubbles before they can collapse. A thin layer maximizes the surface area, contributing to the delicate, breakable quality. If it's too thick, it might be denser and harder to break.
The Impact of Peanut Choice
While often overlooked, your choice of peanuts can influence the final texture and flavor. Using raw peanuts and allowing them to toast in the hot syrup, as suggested by Nicole McLaughlin, contributes to a deeper, more robust "dark and rich" flavor that permeates the entire brittle. This slow toasting also affects the peanuts' texture, making them perfectly crunchy within the brittle. Experimenting with blanched vs. unblanched, or even different nut varieties (like cashews or almonds mentioned in some recipes), can open up a world of customization for your perfect peanut brittle.
Beyond the Basics: Storage, Gifting, and Customization
Once you've mastered the art of making flawless peanut brittle, knowing how to store it and share it ensures its deliciousness lasts.
Proper Storage for Lasting Crunch
To maintain that coveted crisp texture, proper storage is crucial. Always store peanut brittle in an airtight container at room temperature. The enemy of brittle is moisture, which will cause it to soften and lose its snap. For this reason, refrigeration is strongly advised against, as the moisture in a fridge will inevitably ruin the texture. When stored correctly, homemade peanut brittle can maintain its quality for one to two months.
Freezing for Extended Enjoyment
Yes, you can freeze peanut brittle! It's an excellent option if you're making large batches or want to enjoy it far beyond its typical shelf life. Simply place cooled brittle in zip-top freezer bags or freezer-safe containers, ensuring as much air is removed as possible. It can be frozen for up to three months. Be aware that freezing might slightly alter the texture, making it a touch chewier upon thawing. Thaw it in the refrigerator overnight or on the counter for a few hours before serving.
Gifting and Customization
Peanut brittle makes an exquisite homemade gift. Its impressive appearance and delightful taste make it a cherished present for holidays, birthdays, or just because. Package it in pretty tins, cellophane bags, or decorative boxes tied with a ribbon for a thoughtful touch. For more gifting inspiration and a classic recipe, check out Master Classic Peanut Brittle: Easy Recipe & Gifting Tips.
Don't be afraid to experiment with your brittle! While peanuts are classic, cashews, almonds, or even a mix of nuts can create new flavor experiences. You can also play with spices – a pinch of cinnamon, a touch of cardamom, or even a hint of cayenne pepper can add an unexpected twist. The base candy recipe is incredibly versatile, inviting creativity.
Creating perfect peanut brittle is a rewarding culinary journey that combines a little bit of science with a lot of love. By understanding the critical role of each ingredient, mastering the precise timing and temperature, and harnessing the magic of baking soda, you can consistently achieve that delightful, airy crunch that makes homemade peanut brittle truly irresistible. So, gather your ingredients, prepare your workspace, and get ready to impress with your own batch of this timeless, sweet-and-salty candy.
